How to get nail polish out of tile floor? This guide is your ultimate weapon against those pesky nail polish spills. From quick fixes to stubborn stains, we’ll equip you with the knowledge and techniques to conquer any nail polish disaster on your tile floors. Understanding the different types of nail polish and their unique characteristics is crucial to choosing the right cleaning method.
Get ready to reclaim your pristine tile floors, one stain at a time!
Nail polish stains can be a real pain, especially when they happen on a delicate tile floor. The key is acting fast, and knowing the best way to remove the stain, depending on the type of nail polish and the type of tile. This guide will walk you through various effective cleaning methods, step-by-step, to ensure a sparkling clean floor without damaging the tiles.
Let’s dive in and get those floors looking brand new again!
Nail Polish Removal from Tile Floors
A common household mishap is the accidental spillage of nail polish onto tile floors. This can be a frustrating issue, especially if the polish is left unattended. Quick action is crucial in preventing stubborn stains from setting in, impacting the aesthetics and potentially requiring more extensive cleaning. Different types of nail polish, such as acrylic and gel, present unique challenges in removal, necessitating tailored approaches.
Understanding these nuances is essential for effective stain removal.
General Principles of Stain Removal
Nail polish stains on tile floors, regardless of type, require prompt attention. The longer the polish sits, the more difficult it becomes to remove. The chemical composition of the polish, specifically whether it’s acrylic or gel-based, influences the appropriate cleaning agents. Acrylic nail polish is often easier to remove than gel, which typically requires more aggressive solvents.
Generally, a gentler approach is preferable initially, escalating to stronger solutions only if needed. Proper identification of the type of nail polish is paramount to selecting the most effective removal method.
Different Approaches to Nail Polish Removal
Several methods can be employed to remove nail polish stains from tile floors. Some methods are gentler and more suitable for initial attempts, while others may be necessary for stubborn stains. The choice of method will depend on the type of nail polish and the severity of the stain.
Table of Recommended Nail Polish Removal Methods
| Type of Nail Polish | Recommended Solvent | Application Method | Precautions |
|---|---|---|---|
| Acrylic Nail Polish | Acetone-based nail polish remover | Dab the stain with a cotton ball or cloth soaked in the remover. Avoid saturating the tile. | Avoid prolonged exposure to the remover, as it can damage the tile grout. Test the remover in an inconspicuous area first. |
| Gel Nail Polish | Specific gel polish removers (containing acetone or other solvents) | Apply a small amount of the remover to a cotton swab or cloth and gently rub the stain. Use a soft bristle brush for stubborn areas. | Gel polish removers may be more aggressive than acetone. Always test in a hidden area before applying to the stain. Use caution when working around the area. |
| Nail Polish (Any Type) | Isopropyl alcohol (rubbing alcohol) | Apply a small amount of isopropyl alcohol to a cotton ball or cloth and dab the stain gently. | Isopropyl alcohol can be less effective than acetone, particularly for gel polish. Avoid prolonged exposure to the alcohol to prevent any damage to the floor. |
| Nail Polish (Any Type) | Dish soap and warm water | Mix dish soap with warm water in a bowl. Use a sponge or soft cloth to gently scrub the stain. Rinse thoroughly. | This method may not be effective for stubborn or dried nail polish. It’s usually best used as a preliminary step. |
Identifying the Nail Polish Type
Knowing the type of nail polish is crucial for effective removal from tile floors. Different nail polish formulations react differently to cleaning agents, and using the wrong method could damage the tile or leave stubborn residue. Proper identification ensures you select the most suitable and least damaging cleaning approach.
Nail Polish Types and Characteristics
Various nail polish types exist, each with unique compositions and properties. Understanding these differences is key to selecting the appropriate cleaning method.
- Acrylic Nail Polish: Often characterized by a hard, durable finish. They typically contain a mix of polymers and resins, making them more resistant to solvents compared to other types. Acrylic nail polish often has a thick consistency, leading to more challenging removal.
- Gel Nail Polish: Gel polishes are known for their high shine and long-lasting effects. They are usually thicker and more viscous than traditional nail polish. Their formulation often includes UV-cured resins, making them more resistant to solvents than standard nail polish.
- Regular Nail Polish: These are the most common type, typically composed of solvents, resins, and pigments. Their consistency can vary, and they are usually the easiest to remove compared to acrylic or gel nail polishes. They are more susceptible to damage from harsh chemicals.
Identifying Nail Polish on Tile
Visual inspection is the initial step in identifying nail polish type. Observe the color, consistency, and any visible signs of curing or hardening.
- Color: Different nail polish colors can offer a hint, but it is not definitive. Red, blue, or green nail polish will not definitively indicate the exact type.
- Consistency: A thick, viscous consistency might suggest an acrylic or gel polish. A thinner consistency typically points to regular nail polish. Note the viscosity of the spill on the tile.
- Curing: Look for signs of hardening or drying. Hardened or dried spills suggest a longer drying time, implying a more resistant type of polish. Gel polishes, for example, are often cured with a UV lamp.
Importance of Accurate Identification
Accurate identification of the nail polish type is critical for choosing the right cleaning method. Using an unsuitable approach can lead to damage to the tile surface or leave stubborn stains.
| Nail Polish Type | Typical Characteristics | Effect on Surfaces (e.g., Tile) | Recommended Cleaning Method |
|---|---|---|---|
| Acrylic | Hard, durable, thick | May require stronger solvents | Careful application of a mild solvent or specialized cleaner |
| Gel | High shine, long-lasting, thick | Resistant to solvents, may require specific removers | Use a gel polish remover or a nail polish remover specifically designed for gel. |
| Regular | Solvents, resins, pigments, thinner consistency | Generally less resistant to solvents, easier to remove | A mild, general-purpose nail polish remover or a similar solvent. |
Effective Cleaning Methods
Removing nail polish from tile floors requires careful consideration of the type of polish and the cleaning solution used. Choosing the wrong method can lead to damage to the tile or lingering stains. Understanding the strengths and weaknesses of various cleaning agents is crucial for a successful and safe removal process.
Comparing Cleaning Solutions
Different cleaning solutions offer varying degrees of effectiveness and safety when dealing with nail polish stains. Rubbing alcohol, acetone, and dish soap are common household products, but their suitability depends on the specific nail polish type and the tile material. A dedicated nail polish remover designed for tough stains provides a targeted approach.
Cleaning nail polish from tile can be tricky, but a little elbow grease goes a long way. For a healthy pond, consider using pond fish food 50 lb to keep your fish thriving. Just remember to gently blot the stain with a clean cloth and then use a mild detergent to remove the rest of the polish, ensuring you don’t damage the tile.
Household Cleaning Products
Household cleaning products like rubbing alcohol and acetone are effective solvents for dissolving nail polish. Rubbing alcohol is generally safer for delicate surfaces, but its effectiveness may vary depending on the nail polish’s composition. Acetone, a stronger solvent, is more potent but may potentially damage certain types of tile, especially those with a sealant layer. Dish soap, while not a direct solvent, can help lift the polish from the surface and aid in its removal.
It’s crucial to consider the potential for residue and the need for thorough rinsing.
Nail Polish Remover for Stains
Specialized nail polish removers are formulated to remove nail polish effectively. These removers often contain ingredients designed to dissolve various nail polish types with minimal damage to surfaces. They are typically more targeted and less harsh than some household cleaning products. The process of using a nail polish remover specifically designed for removing stains involves applying a small amount to a clean cloth or sponge, gently blotting the stain, and then rinsing thoroughly with water.
Safe and Effective Cleaning Solutions
To ensure a safe and effective cleaning process, prioritize using specialized nail polish removers first. If these are unavailable or unsuitable, rubbing alcohol can be a viable alternative, particularly for less stubborn stains. Acetone should be used with caution and only on appropriate tile types. Dish soap can be used as a preliminary step to lift the polish before employing a more potent solvent.
Effectiveness of Cleaning Solutions
| Cleaning Solution | Nail Polish Type | Effectiveness | Pros | Cons |
|---|---|---|---|---|
| Rubbing Alcohol | Water-based nail polish | Good | Generally safe for most tile types | May not be effective on highly pigmented or thick nail polish |
| Acetone | Acrylic nail polish, gel nail polish | Excellent | Highly effective at dissolving many types of nail polish | Potentially harmful to some tile types, especially sealed ones. May damage or discolor the tile |
| Specialized Nail Polish Remover | Various types of nail polish | Very Good | Designed for effective stain removal with minimal damage | Can be more expensive than other solutions |
| Dish Soap | All types | Moderate | Can loosen the polish for easier removal | Requires additional cleaning steps. May leave a soapy residue |
Practical Application Steps
Removing nail polish from tile floors effectively requires careful consideration of the type of polish and the cleaning method. Incorrect application can lead to stubborn stains or damage the tile surface. Following the detailed steps Artikeld below will ensure a successful and safe removal process, minimizing the risk of spreading the stain or harming the floor.
Applying Cleaning Solutions Safely
Proper application of cleaning solutions is crucial to avoid damaging the tile or spreading the stain further. Carefully consider the type of tile and the cleaning agent to prevent potential harm. The chosen cleaning method should be gentle enough to remove the stain without harming the tile’s surface or compromising its integrity.
| Step | Action | Safety Precautions |
|---|---|---|
| 1 | Assess the stain. | Inspect the affected area thoroughly for the extent of the stain and its consistency. Note any surrounding areas that may need protection. |
| 2 | Prepare the work area. | Cover surrounding areas with newspaper or plastic sheeting to prevent the cleaning solution from spreading or staining. Wear protective gloves and eyewear to safeguard skin and eyes from potential irritants. |
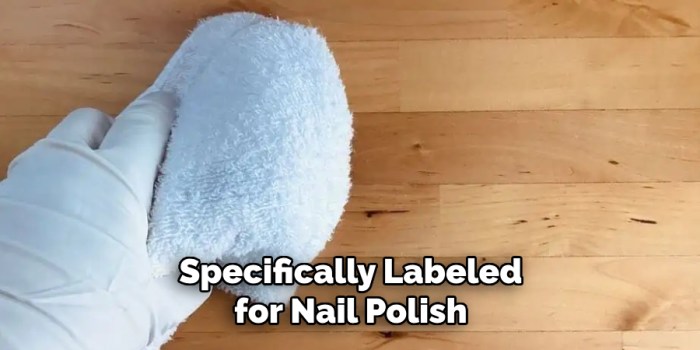
| 3 | Apply the cleaning solution. | Apply the cleaning solution directly to the nail polish stain using a clean cloth or sponge. Avoid using excessive pressure, as this could damage the tile. |
| 4 | Allow the solution to work. | Allow the cleaning solution to sit on the stain for the recommended time, as indicated on the product label or instructions. Avoid rushing this step. |
| 5 | Scrub gently. | Gently scrub the stain using a soft-bristled brush or a non-abrasive sponge. Avoid harsh scrubbing or abrasive materials, as this can scratch the tile surface. |
| 6 | Rinse thoroughly. | Rinse the affected area thoroughly with clean water to remove all traces of the cleaning solution. Use a clean cloth or sponge to wipe away any residue. |
| 7 | Dry completely. | Allow the tile to dry completely before walking on it to prevent slipping or further damage. Use a clean towel or paper towels to absorb any remaining moisture. |
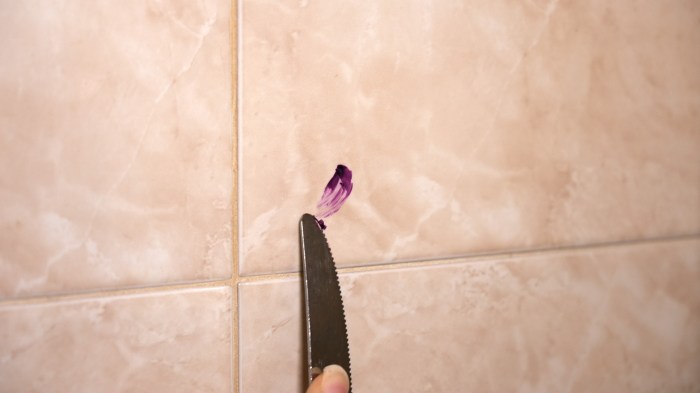
Avoiding Spreading the Stain
To prevent the nail polish stain from spreading, work in a contained area. Use newspapers or plastic sheeting to protect surrounding areas from accidental spills or splashes. This protective barrier helps to contain the cleaning solution and minimize the risk of staining adjacent surfaces. Start from the center of the stain and work your way outwards to prevent the stain from spreading.
Applying Cleaning Solutions for Different Nail Polish Types
Different types of nail polish respond differently to cleaning solutions. Acetate-based polishes, for example, might require a different approach compared to nitrocellulose-based polishes. Always refer to the specific instructions for the cleaning agent to ensure optimal results and prevent damage to the tile.
Preventive Measures: How To Get Nail Polish Out Of Tile Floor
Preventing nail polish spills on your tile floors is easier than you think. By incorporating a few simple preventative measures into your routine, you can significantly reduce the risk of unsightly stains and the need for costly clean-up. These strategies also contribute to maintaining the pristine condition of your tile floors, extending their lifespan and preserving their aesthetic appeal.Implementing proactive steps to avoid nail polish spills on your tile floors will save you time, effort, and potential headaches.
These strategies are not just about preventing spills, but also about promoting a more efficient and less stressful nail application process.
Strategies to Prevent Spills
Proper preparation and mindful application techniques can drastically minimize the chance of nail polish ending up on your tile floors. By taking precautions, you can maintain a spotless environment while enjoying your nail polish application.
- Strategic Placement: Position your work area over a drop cloth or newspaper to contain any accidental spills. A designated area, such as a table or counter with a protective surface, helps to contain the mess.
- Protective Surfaces: Use a sturdy, non-porous surface like a table or a tray to apply nail polish. This will catch any drips and prevent them from reaching the floor. Consider placing a sheet of newspaper or plastic sheeting underneath the work surface to maximize containment.
- Controlled Application: Apply nail polish in a controlled manner, avoiding excessive amounts. Take your time and be deliberate in your movements. Avoid sudden or jerky motions, as these can increase the risk of drips or spills. Consider using a small brush or a specific applicator tool designed for precision application.
- Proper Nail Polish Application: Applying nail polish in a well-ventilated area will reduce the risk of accidental spills. Using a good quality nail polish and applying it in thin, even coats will minimize the chance of drips.
- Protective Materials: Using protective materials, such as old towels or newspapers, will protect your tile floor. Cover the area around the work surface to catch any stray nail polish drops. If applying nail polish outdoors, consider placing a tarp or similar protective covering under your work area to prevent spills on the ground.
Maintaining Tile Floor Cleanliness
Regular cleaning and maintenance are crucial for preventing spills from becoming permanent stains. These simple routines will keep your tile floors looking their best and prevent nail polish spills from becoming a persistent problem.
A little nail polish on your tile floor can be a real worry, but don’t fret! There are simple solutions. Imagine enjoying a new home, perhaps even in beautiful Mallorca, with its sun-drenched charm, and discovering apartments to buy in majorca that perfectly suit your needs. Once you’ve found your perfect place, you can focus on those pesky nail polish stains, and get them out easily.
- Regular Cleaning: Regularly sweeping or vacuuming your tile floors to remove loose debris and dust will prevent nail polish from adhering to the surface.
- Proper Cleaning Techniques: Employing the right cleaning products and techniques for your tile floors will help prevent nail polish from becoming deeply embedded. Using a mild, non-abrasive cleaner can effectively maintain the floor’s shine and prevent the build-up of spills and stains.
- Regular Inspection: Regularly inspecting your tile floors for any signs of spills or stains will help to address issues promptly. This will help to avoid the nail polish from drying and hardening on the surface.
Best Practices Summary
The following table summarizes the best practices to avoid nail polish spills on tile floors:
| Preventive Measure | Description |
|---|---|
| Strategic Placement | Position your work area over a protective surface. |
| Protective Surfaces | Apply nail polish on a sturdy, non-porous surface. |
| Controlled Application | Apply nail polish slowly and deliberately. |
| Proper Nail Polish Application | Use good quality nail polish and apply in thin coats. |
| Protective Materials | Use drop cloths or newspaper to cover the floor. |
Troubleshooting and Special Cases
Removing nail polish from tile floors can sometimes present unique challenges, especially with stubborn stains or specific tile types. Understanding these potential issues and the appropriate solutions is crucial for a successful clean. This section details troubleshooting steps for various scenarios, ensuring a spotless result.
Stubborn Stains
Nail polish, especially if allowed to dry completely, can become incredibly difficult to remove. Heat and pressure from prolonged drying can cause the polish to bond more firmly to the tile. Solutions often require more aggressive cleaning methods or multiple applications of specific cleaning agents. Repeated applications of a cleaning solution, followed by thorough rinsing and drying, can often be necessary to achieve complete removal.
Old Stains, How to get nail polish out of tile floor
Dealing with old nail polish stains requires extra care and patience. The longer the stain remains on the tile, the more likely it is to become deeply embedded. Begin by trying the cleaning methods recommended for fresh stains. If these fail, consider using a specialized tile cleaner or even consulting a professional cleaning service, particularly if the stain has been present for an extended period.
This approach can prevent damage to the tile and ensure the stain is fully removed.
Different Tile Types
Tile composition significantly impacts cleaning efficacy. Porcelain tiles, known for their durability, generally tolerate stronger cleaning solutions than delicate ceramic tiles. Using abrasive cleaners on delicate ceramic tiles can potentially scratch or damage the surface. Always test cleaning solutions in an inconspicuous area first, ensuring they don’t harm the tile.
Troubleshooting Table
| Nail Polish Type | Stubborn Stain? | Old Stain? | Tile Type? | Troubleshooting Steps |
|---|---|---|---|---|
| Acrylic | Yes | Yes | Porcelain | Use a specialized nail polish remover, then a mild tile cleaner. Repeat as needed. |
| Gel | Yes (often more resistant) | Yes (may require more effort) | Ceramic | Apply a gel nail polish remover and let it sit for several minutes. Follow with a gentle scrub and a final rinse. |
| Regular | No | No | Marble | Use a mild dish soap solution and a soft cloth. Avoid harsh scrubbing. |
| Metallic | Yes | Yes (May leave discoloration) | Stone | Apply a gentle solvent, like acetone or nail polish remover, and blot. Avoid prolonged contact and test on an inconspicuous area first. |
Safety Precautions
Cleaning nail polish from tile floors can be straightforward, but safety should always be paramount. Proper precautions minimize the risk of harm and ensure a clean and efficient process. Following safety guidelines is crucial for preventing accidents and protecting your health while handling cleaning solutions.
Essential Safety Gear
To ensure a safe cleaning process, personal protective equipment (PPE) is highly recommended. This includes safety glasses or goggles to shield your eyes from splashes or fumes. A well-fitting respirator or mask is crucial for filtering out potentially harmful vapors or dust particles released during cleaning. Gloves, ideally made of nitrile or latex, provide protection to your hands from chemical exposure and abrasions.
Proper attire, such as long sleeves and pants, is also essential to prevent skin contact with harsh chemicals.
Ventilation Considerations
Adequate ventilation is vital when using cleaning solutions. Working in a well-ventilated area, such as outdoors or in a room with an open window or exhaust fan, significantly reduces the risk of inhaling harmful fumes. Ensure the room has sufficient airflow to disperse the vapors effectively. If working indoors, open windows and doors to maximize air circulation.
In confined spaces, using a powerful exhaust fan is strongly recommended.
Safe Handling of Cleaning Solutions
Cleaning solutions, even seemingly benign ones, can pose risks if not handled correctly. Always follow the manufacturer’s instructions for mixing, application, and dilution ratios. Never mix cleaning solutions unless specifically instructed to do so in the product’s instructions. Pour cleaning solutions into designated containers, avoiding direct skin contact. Store cleaning solutions in a cool, dry, and well-ventilated place, away from children and pets.
Potential Hazards of Cleaning Solutions
Certain cleaning solutions contain chemicals that can cause skin irritation, eye damage, or respiratory problems if not handled with care. For example, some solvents can be flammable or cause allergic reactions. Acids and bases can cause severe burns if they come into contact with skin or eyes. Always read the labels carefully to understand the potential hazards associated with the cleaning solutions used.
Potential Hazards and Safety Measures
| Potential Hazard | Corresponding Safety Measures |
|---|---|
| Skin irritation/allergic reactions | Wear gloves, protective clothing, and eye protection. If skin contact occurs, wash the affected area immediately with plenty of water. |
| Eye damage | Wear safety glasses or goggles. If eye contact occurs, flush the eyes immediately with cool water for at least 15 minutes and seek medical attention. |
| Respiratory problems (inhalation of fumes) | Work in a well-ventilated area. Use a respirator or mask if necessary. Avoid prolonged exposure to fumes. |
| Flammability | Store cleaning solutions away from open flames and heat sources. Use caution when handling and avoid smoking in the area. |
| Chemical burns (acids/bases) | Wear appropriate protective gear. Avoid skin contact. If contact occurs, immediately flush the affected area with copious amounts of water and seek medical attention. |
Ultimate Conclusion
We’ve covered everything from identifying the type of nail polish to choosing the right cleaning solution, and even tackled those tricky stubborn stains. Remember, prompt action is key, and understanding the type of nail polish will determine the best course of action. By following the practical application steps and preventive measures, you can keep your tile floors looking their best.
Now go forth and conquer those nail polish spills with confidence! Your tile floors will thank you.
Question Bank
What if the nail polish has been on the floor for a while?
Older stains might require more aggressive cleaning methods. Start by using a gentle cleaner first, and if that doesn’t work, gradually move to stronger solvents, but always test in an inconspicuous area first. Also, consider the type of tile; some are more susceptible to damage than others.
Can I use any type of nail polish remover?
Not all nail polish removers are created equal. Acetone-based removers are often strong enough for acrylic and gel nail polish but can damage some tile surfaces. It’s best to use a nail polish remover specifically designed for tile or a gentler alternative.
How do I avoid spreading the stain?
Work from the outside of the stain inwards, blotting or gently lifting the polish instead of scrubbing. Use paper towels or clean cloths to absorb the polish, avoiding harsh rubbing which can spread the stain and potentially damage the tile.
What if the stain is on a delicate or patterned tile?
Always test any cleaning solution in a hidden area first to ensure it won’t damage the tile or alter its color. Start with gentler cleaning methods and work your way up to stronger solutions if necessary.
